Appearance
Self-hosted 3D Viewer
Overview
Our self-hosted 3D viewer is designed to be simple to setup and maintenance-free, without compromising on performance or quality.
The architecture is based purely on front-end technologies and smart folder structure, eliminating the need for backend languages or complex server configurations.
Deployment step is simply uploading two folders to your server:
- Viewer folder (contains the application code)
- Scene Data folder (contains your scene content)
Another advantage of our solution compared to others is that the viewer code is shared across all scenes, so any updates or modification will be automatically applied to all scenes.
INFO
Self-hosted Viewer remains fully compatible with Viewer API.
TIP
Self-hosted Viewer can also be used as an Offline 3D Viewer
Download self-hosted package
Note:
Self-hosted is only available in Custom Plan.
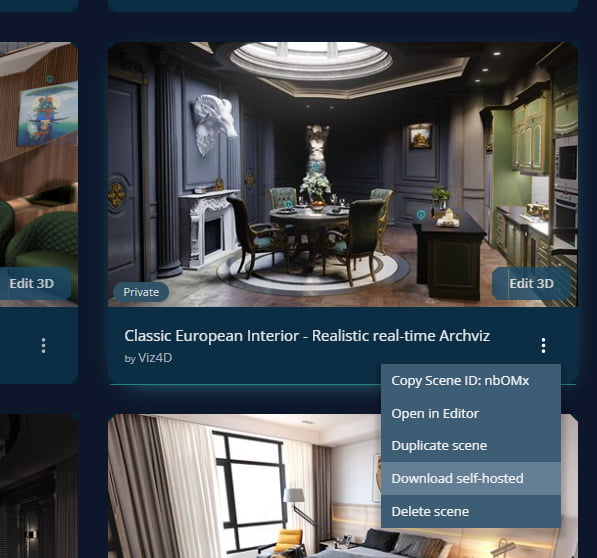
To download Self-hosted 3D Viewer, go to your profile at https://viz4d.com/home and click button Download self-hosted:

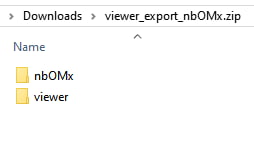
The downloaded result is a zip file contains:
- Viewer Folder: Contains the latest 3D Viewer code.
- Scene Data Folder: Named with the Scene ID, containing scene-specific data.
Inside zip package: 
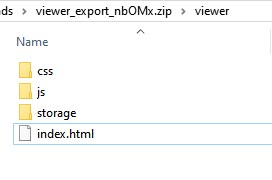
Inside viewer folder is a index.html file with other code & resources: 
Deploy self-hosted viewer
Assuming you upload these folders to your webserver’s public directory, then you can open the scene using: domain.com/viewer/?id=scene1
or:domain.com/viewer/index.html?id=scene1
Note
The "id" parameter must match the scene data folder name.
You can rename scene data folder to your preferred name.
Default folder structure:
By default, scene data folders are expected to be at the same level as the viewer folder:
- /viewer
- /scene1
- /scene2
Custom folder structures:
Grouping scenes into subfolders:
Url: domain.com/viewer/?id=collection-a/scene1
Example folder structure:
- /viewer
- /collection-a
    - /scene1
    - ...
- /collection-b
    - /scene2
    - ...
Scene data not the same location as viewer folder:
You can use pattern ../ to go up 1 level: domain.com/upload/viewer/?id=../data/scene1
Or using Root-relative path (starting with /): domain.com/upload/viewer/?id=/data/scene1
Example folder structure:
- /data
    - /scene1
- /upload
    - /viewer
Scene data in a different domain:
Url: domain.com/viewer/?id=https://external-storage.com/data/scene1
Note
external-storage.com must be configured to allow CORS from domain.com.
Folder structure for multiple scenes
We recommend using a single "viewer" folder for multiple scenes:
- /viewer
- /scene1
- /scene2
- /scene3
TIP
This approach offers a key benefit that you only need to update viewer code at one place, it will be automatically applied to all scenes.
Update viewer code to latest version
- Download the self-hosted package for any scene
- Extract the
viewerfolder (it contains the latest viewer code at the time of download) - Upload and overwrite your existing
viewerfolder
Customizing html / css / js
Create a _custom folder at the same level as the viewer folder:
- /viewer
- /_custom
    - custom.html
    - custom.css
    - custom.js
Details:
- custom.css: Load at the end of
<head> - custom.html: Loaded asynchronously and appended to the end of
<body> - custom.js: Executed last, after
custom.htmlis appended
WARNING
Don’t edit index.html or other files inside viewer folder, because when you update viewer code, all files inside viewer folder will be overwritten. All custom code should be placed in _custom folder.
INFO
<script> tags in custom.html won't work. Place JS code in custom.js instead.
