Appearance
Viz4D Fusion Quickstart Tutorial
Overview Workflow
Viz4D Fusion turns your Render File (D5 Render / Chaos Vantage) into Realtime Interactive Archviz.
Step 1. Prepare your Render File
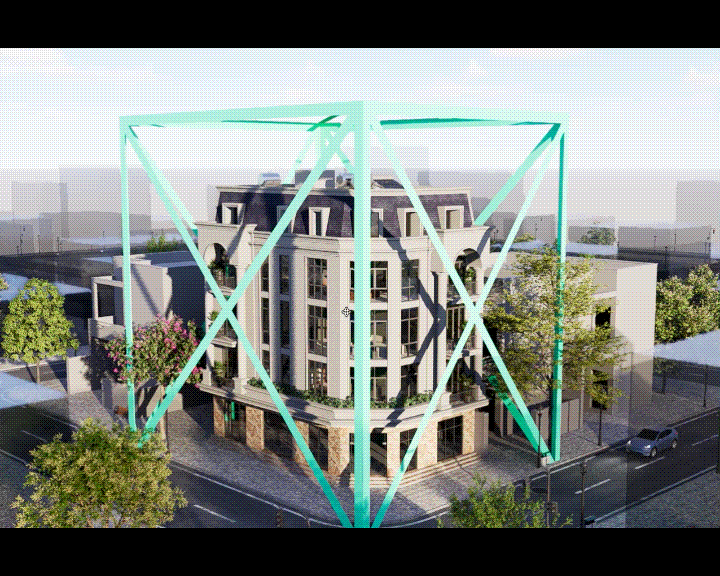
Open your render file (.drs or .vantage), then import the
_Viz4D_Area_Box_.fbxfile to define your main area.
Download_Viz4D_Area_Box_.fbxfileScale and move that box so it tightly fits your main area.
✅ DoTightly fit the box around the main area.
 ❌ Don’t
Avoid oversized or loosely fitted boxes.
Hide all those boxes and save your file.
Your Render File is ready to use in Viz4D.
Note
- The box must tightly fit the main area. Otherwise, it will affect the final resolution.
- Do not rotate the boxes, rotation is not supported yet.
- The more boxes you add, the longer the processing time will be.
IMPORTANT
- Do not rename the
_Viz4D_Area_Box_.fbxfile. - Disable all animations in your render file, as they may cause poor output quality.
Note
- D5 Render : The lighting for rendering is taken from the first scene in your Scene List.
- Vantage : The lighting for rendering is taken from the current scene state.
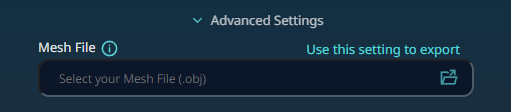
(optional) Advanced Settings
Mesh File
When should you provide a Mesh File?
Providing a Mesh File is optional, but recommended in these cases: - When your result looks poor.
- When you want your scene processed with greater precision.
How to create a Mesh File?
Export your entire scene as an .obj file using the settings from the 'Use this setting to export' button.
For Proxies
You don’t need to export the full geometry of proxies when creating a Mesh File. Using preview meshes (Edge, Face, or Box) is fine.
- If possible, export full geometry for the best results.
- Box mode is not recommended, but acceptable if the scene is too heavy.
Step 2. Start Auto Processing
Select the Render File you just created as the Render File, then click Start to begin automatic processing.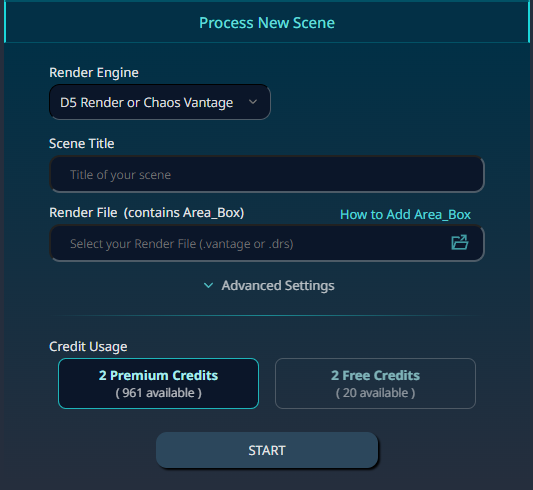
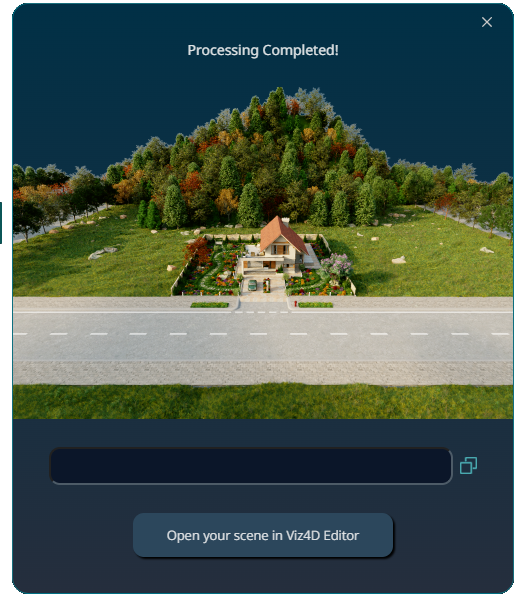
Once the process is complete, you’ll receive a link to open your scene in the Viz4D Editor.
Step 3. Edit Info and Scene Visibility
Note
Scenes processed using Free Credits are always Public. Visibility of free scene cannot be changed. Scenes processed using Premium Credits are Private by default.
(optional) Creating Hotspot and Tour
- Hotspot : Add information for specific objects or areas.
- Tour : Let viewers experience your scene the way you want.
Info
Insert your CAD, BIM, technical drawings, Architectural Animation,… using the Overlay feature (available in both Tours and Hotspots). You can also use Overlay to add callouts or text labels directly onto your scene.