Appearance
Rebake Lightmap
INFO
Rebake lightmap is used to change lighting, change lightmap resolution and fix lightmap errors after you upload scene.
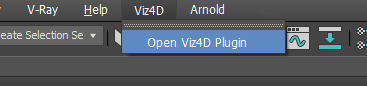
Step 1. Open Max file and Viz4D plugin
- Open file .max with ‘v4_rebake_’ in the name. It was saved in the same directory as your original Max file.
- At the main menu bar, open the Viz4D menu and click on the “Open Viz4D Plugin” item.
INFO
You can rebake lightmap as many times as you want. It’s free of charge.
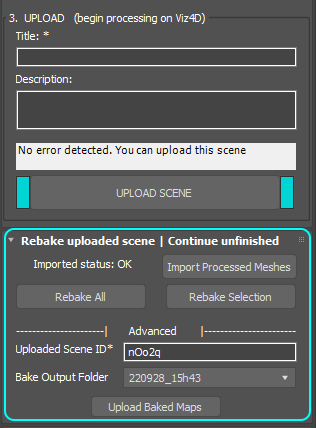
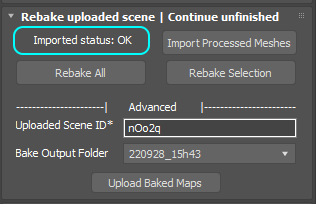
Step 2. Check status
Check the imported status. If the status is ❌, click “Import processed meshes” button to turn the imported status to “OK”.
WARNING
The imported status must be “OK” before taking the next steps.
Step 3. Follow the instruction depends on your case:
Change lightmap setting:
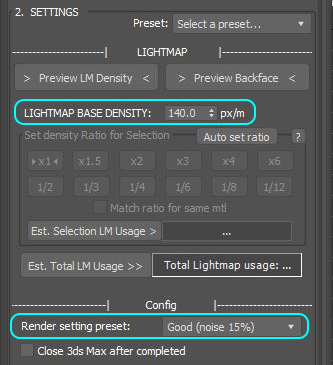
When rebake, you can only change Lightmap Base Density and Render setting preset. Let’s adjust the parameter to what you want.
Change lighting
Just update lighting normally.
Note: Don’t use include/exclude light because we don’t support it.
Fix lightmap error
TIP
Sometimes the lightmap error disappears when increasing quality of mesh to Ultra. So you should try it first, if it has no effect then follow the step below.
Choose error you got to see what to do next:
Light leaks
Details
To see what light leaks look like, see the image below (the light leaks is the white border at the ceiling).
Solution: To prevent light leaks, create a mesh to wrap all your objects inside (the mesh color is absolute black). In the position have the window, make hole to get light go through. Finally, remember to freeze it.
Black lightmap
Details
Wrong face orientation causes black lightmap. It happens when you forget to fix incorrect face orientation.
Solution: Select the face that has the wrong orientation and flip it.
TIP
Note: When lightmap rebaking is done, in Viz4D Editor, you need set Face rendering of object to Double sided.
Lightmap noise with black and white color
Details
To see black and white noise look like, watch the video below. These noises appear when the lightmap has too much noise so the denoiser can't remove it all.
Solution:
Set the “Render setting preset” to higher than it is now to remove the noise.
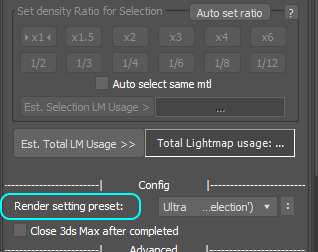
If the lightmap still has noise when “Render setting preset” is “Ultra” then you need to set “Render setting preset” to “Keep current”.
“Keep current” means the baking lightmap process will use the current render setting. So you can adjust render setting as you want.
We recommend you adjust the render setting based on our “Ultra” preset. To apply our preset, do this:
Lightmap noise with colorful color
Details
To see what colorful noise looks like, watch the video below. These noises are caused by light leaks.
Solution:
To prevent this kind of noise, create a mesh to wrap all your objects inside (the mesh color is absolute black). In the position have the window, make hole to get light go through. Finally, remember to freeze it.
You can contact us at [email protected] for any questions.
WARNING
Don't change UV of mesh. It’ll cause lightmap problem.
Step 4. Rebake lightmap
If you want to rebake for a duplicated scene:
You have to change “Uploaded Scene ID” in Viz4D Plugin so it will upload lightmap to the correct scene: You need to get the ID of the duplicated scene and then paste that ID into “Uploaded Scene ID”, following the video below
Then do the next steps as usual.There are 2 buttons: Rebake All and Rebake Selection. These 2 buttons have the same effect, the only difference is:
- Rebake All: will rebake lightmap of all objects in scene
- Rebake Selection: will only rebake lightmap of selected objects
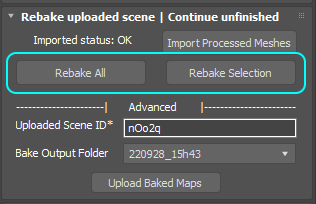
To save time to bake lightmap, select the objects that need to rebake and then click “Rebake selected” button. If you need to rebake the whole scene, click the “Rebake all” button.
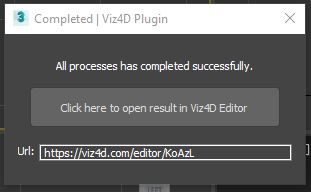
When lightmap rebaking is complete, the below window will appear: